


Understand key changes introduced in NVivo 9
If you are moving from NVivo 8 to NVivo 10 (and are not familiar with NVivo 9), this topic will help you to understand key changes that were made to the software in the NVivo 9 release.
For information about features introduced in NVivo 10, refer to What's new in NVivo 10.
In this topic
- What has happened to the menus and toolbars?
- Where are tree nodes, free nodes and cases?
- Where is the casebook?
- Changes to Navigation View
- New types of sources—PDFs, datasets and framework matrices
- Work with sources and models in edit mode
- View coding stripes while you edit sources
- Aggregate nodes—gather the content coded at child nodes
- Import (or record) information about your sources
- Color—set the color of coding stripes, group your sources and more
- Queries and visualizations
- Reports and extracts—summarize your project or use data in other applications
- Opening an NVivo 8 project in NVivo 10
What has happened to the menus and toolbars?
At the top of the NVivo window, you will notice that the menus and toolbars have been replaced by a ribbon. The ribbon was first introduced in Microsoft applications—it is designed to help users find, understand and use commands efficiently and directly.
For information about commands on the new ribbon, refer to NVivo ribbon tabs. For general information about working with the ribbon refer to Use the ribbon.
Remember that you can still right-click to access commands in context.
If you are familiar with NVivo 8 menus, you can download and use the NVivo 10 ribbon mapping spreadsheet to locate a menu command on the ribbon.
 Top of Page
Where are tree nodes, free nodes and cases?
If you are familiar with NVivo 8, you will notice that a single Nodes folder replaces the Free Nodes, Tree Nodes and Cases folders to create a simpler and more flexible way to work with your node structures.
You can now create your own folders to organize your nodes—for example, you may have a folder for the nodes that represent 'cases' and another folder for nodes related to a specific theme.
If you open a project that was created in NVivo 8, folders are automatically created for your free nodes, tree nodes and cases—refer to Open a project created in an earlier version for more information.
You can still create 'free nodes'—they are simply nodes that do not have children.
To create a 'case', you just create a node and classify it. For example, create a node for an interview respondent, classify it as person and define the attribute values such as, age, sex and location. Refer to About nodes (creating nodes for people, places and other entities) for more information about how cases are handled in NVivo 10.
Refer to About nodes for more information.
Where is the casebook?
If you are used to working with the casebook in NVivo 8, you will notice that the casebook has been replaced by 'classification sheets'.
Instead of opening the 'casebook', you open a classification sheet to see a list of all the nodes (or sources) that belong to the classification, including their attribute values.
For example, you could open the classification person to see all the nodes that represent people. You can filter and sort the nodes based on their attribute values, and you can change their attribute values if necessary.
You can still import 'casebook' information—refer to Import (or export) classification sheets for more information.
Changes to Navigation View
Navigation View has been rearranged and now includes new groups for Collections and Reports:
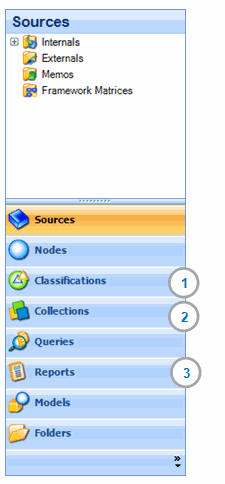
1 Classifications this group has changed position in the Navigation View and now provides access to source and node classifications and relationship types—refer to About classifications for more information.
2 Collections merges the original Sets and Links groups and contains sets, search folders, memo links, 'see also' links and annotations—refer to About collections for more information.
3 Reports provides access to predefined or custom-made reports and extracts—refer to About Reports and Extracts for more information.
New types of sources—PDFs, datasets and framework matrices
Three new source types have been added to NVivo:
-
PDFs—the layout and format of PDFs is preserved when you import them into NVivo, because they are now stored in your project as a PDF source (rather than a document source)
-
Datasets—allow you to import and work with qualitative data stored in spreadsheets, delimited text files and database tables.
-
Framework matrices—provide a way you can summarize your source materials in a grid format. The grid has rows for case nodes (for example, people you interviewed) and columns for theme nodes. Each cell in the grid represents the intersection of a case and theme—this is where you record your summary of source content relevant to that case and theme.
Refer to About sources for more information.
Work with sources and models in edit mode
Sources and models open in read-only mode and you need to switch to edit mode if you want change their content or format.
Read-only mode helps you to avoid accidently editing source content while coding. It also protects the integrity of your sources if you are working with other colleagues on an NVivo Server project—a source cannot be opened in edit mode by two users at the same time.
You cannot set the properties of a source to read-only—a source is always read-only unless you put it in edit mode. Refer to Work in edit mode for more information.
View coding stripes while you edit sources
You can now show coding stripes when you are in edit mode.
Coding stripes are disabled (and do not update), while you type or make other changes to the content of the source. The stripes refresh automatically when you:
-
Code or uncode the source content
-
Switch to read-only mode
-
Save the project
-
Use the 'undo' function
You can refresh the stripes manually—click the yellow information bar at the top of the coding stripes pane, or click Refresh, in the Workspace group, on the Home tab.
Refer to Use coding stripes to explore coding for more information on working with coding stripes.
Aggregate nodes—gather the content coded at child nodes
When working with nodes in a hierarchy, you can gather all the material in child nodes and roll it up to the parent node. When you open a parent node (that has aggregation turned on) you can see the material coded directly at the node as well as any material coded at its first-level child nodes.
For example, you could create a parent node Pollution and create child nodes below for Industrial Waste, Domestic Sewage and Agricultural Runoff. If you turn on aggregation at Pollution and open the node, you will see everything coded at Industrial Waste, Domestic Sewage and Agricultural Runoff as well.
Refer to Aggregate nodes for more information.
Import (or record) information about your sources
Source classifications allow you record information about your sources—for example, the author and year of a journal article. Each classification has its own set of attributes.
If you import a literature review from reference management tools like EndNote, Zotero or RefWorks—bibliographical classifications are automatically created and applied. If you have made notes about your references, these notes can be imported into NVivo as memos.
You can manually add NVivo's predefined bibliographical classifications to your project and use them to classify your sources—export the data to your reference management tool when you are ready to write up your findings, cite your sources and format the references.
You can create your own custom classifications to record any other type of information about your source materials that is relevant to your project.
Refer to About classifying sources for more information.
Color—set the color of coding stripes, group your sources and more
You can now set the colors of sources, nodes, attribute values and project users. This allows you to use color to visually identify the items in your project—for example:
-
Give your nodes a color and see this reflected in coding stripes, charts, models and tree maps and graphs.
-
Use color to group and identify your sources.
-
Use color to visually identify project users—display coding stripes to easily see the coding done by each team member.
-
Assign a color to attribute values to identify them in charts and tree maps—for example, assign the color green to respondents from rural areas.
You can optionally display source and node colors in List View.
Refer to About color for more information.
Queries and visualizations
Some queries were enhanced and new visualizations were introduced—for example:
-
Text Search queries were enhanced to let you search for synonyms and semantically related words, and now allow you to view the results as a word tree.
-
Word Frequency queries were enhanced to let you search for synonyms and semantically related words, and now allow you to view the results as a cluster analysis diagram.
-
Group query replaces 'Grouped Find'. You can save and rerun Group queries and you can choose to view the results as a connection map.
-
Cluster analysis diagrams were added—these diagrams can help you to see patterns of similarity and dissimilarity in your sources and nodes. For example, you could check whether you have a diverse range of survey respondents, or look for patterns of similarity in the text content of your sources.
- Tree maps were added—tree maps can help you to see how your coding is distributed. Are some sources more heavily coded than others? Do some nodes contain more coding references than others? You can also use tree maps to show the distribution of attribute values—for example, see the demographic spread of your survey respondents.
- Graphs—you can use a graph to see how a source or node is connected to other items in your project.
Reports and extracts—summarize your project or use data in other applications
New reporting features were introduced that allow you to:
-
Run predefined reports
-
Create your own reports using the Report wizard or designer
-
Build reports that include grouping, filtering and summary calculations
-
Export report results for use in other applications such as Word, Excel or PowerPoint
-
Share report 'templates' with other NVivo users and across projects
You can also create extracts to export a data to a text, Excel or XML file—this can be useful when you want to use your data for further analysis in other applications. You can use predefined extracts or create your own, and you can share extract 'templates' with other NVivo users.
Refer to About reports and extracts for more information.
Opening an NVivo 8 project in NVivo 10
Your NVivo 8 project will look slightly different when you open it in NVivo 10. For example:
-
Your free nodes, tree nodes and cases will be converted into nodes—you will find them grouped into folders under the Nodes folder.
-
A node classification called 'case' will be added in the Node Classifications folder under Classifications.
-
There are new folders for Framework Matrices (under Sources) and for Reports and Extracts (under Reports)
Refer to Open a project created in an earlier version for more information.