


Import data from database tables
This topic explains how to create a new dataset source by importing data from a database table or view—for example, a Microsoft Access or SQL Server database table.
What do you want to do?
- Gather your data
- Consider how you want to use your data in NVivo
- Prepare to import a database table or view
- Import data and create a new dataset
- Dataset Import Wizard steps
- Work with your dataset
Gather your data
You cannot add additional records (rows) or fields (columns) to a dataset after import, so it is important to gather your data before you start the import operation.
You cannot select data from multiple tables or views, so the data you want to import must be gathered into a single table or view.
The maximum amount of data that can be imported into a single dataset is 256 fields (columns) and 1,048,576 records (rows).

Consider how you want to use your data in NVivo
You cannot change the analysis type (codable or classifying) of a field (column) after import, so you should decide how you want to use your data before you create a new dataset.
Fields that contain data that you intend to code and analyze should be stored as codable fields—for example, responses to open-ended survey questions, such as How do you think we can reduce our carbon emissions?
Fields that describe your data (metadata) should be stored as classifying fields—for example, the ID number, Age, Sex and Annual Income of your survey respondents. Values in classifying fields:
-
Can be used to sort and filter the records in your dataset.
-
Provide context when you view coded dataset content in a node.
-
Can be used to build node structures that group your codable content—for example, by Age or Sex.
-
Can be used to create and classify nodes that represent the subjects (cases) of your research. For example, if you create a 'person' node for a survey respondent, you can use the classifying field values Age or Sex as attribute values on the node.
When you choose to store a field as a classifying field, you may be able to choose from several possible data types—for example, date or text. You cannot change the data type of a classifying field after import, so it is important to choose a data type that supports sorting, filtering and grouping the field values. For example, if the field contains dates, and you want to filter by date ranges, you should store the values as a date (not as text).
If you want to create nodes that represent the subjects (cases) in your research—you will need a unique identifier for each subject in your data. If your data does not contain a unique identifier that you can use as a node name, you could add a unique ID number for each subject. This identifier should be imported as a classifying field.
Prepare to import a database table or view
-
Ensure that the data you want to import is gathered into a single table or view—you may need assistance from your database administrator to do this.
-
Make sure that the data you want to import is stored in data types that can be imported into NVivo. The following OLE DB data types are supported:
|
BigInt |
DBTime |
LongVarWChar |
UnsignedSmallInt |
|
Binary (see note below) |
DBTimeStamp |
Numeric |
UnsignedTinyInt |
|
Boolean |
Decimal |
Single |
VarChar |
|
BSTR |
Double |
SmallInt |
VarNumeric |
|
Char |
Guid |
TinyInt |
VarWChar |
|
Date |
Integer |
UnsignedBigInt |
WChar |
|
DBDate |
LongVarChar |
UnsignedInt |
NOTE Databases
can store 'binary objects' such as images, documents, audio or video files.
If you import fields containing binary objects, any image, document or
media files in supported
formats (except plain text files) will be imported into NVivo as separate
sources. The dataset contains 'source shortcuts'—you can access
the source by clicking on the shortcut. Refer to About
datasets for more information.
If you intend to import a large number of audio or video files, you should
consider where you want to store your media files—refer to Store
audio and video files for more information.
Import data and create a new dataset
NVivo provides a 'wizard' that guides you through the import process. The wizard examines the data you are importing and helps you to ensure that the data is imported the way that you want.
To create a new dataset:
-
On the External Data tab, in the Import group, click Dataset.
The Import Dataset Wizard opens.
- Follow the instructions in the Import Dataset Wizard. For more information about using the wizard, refer to Dataset Import Wizard steps:
Dataset Import Wizard steps
Step 1
In this step, you will establish a connection to your data source. This topic explains how to:
-
Connect to a Microsoft Access database
-
Connect to a SQL Server database
-
Connect to any ODBC-compliant data source using a data source name (DSN). Consult your network administrator, if you need help with setting up a DSN on your computer. Connecting via a DSN can be convenient, if you regularly import data from the same database.
If you have difficulty establishing a connection, consult your network or database administrator.
To connect to a Microsoft Access database:
-
Click Browse, and then select files of type ODBC. The Data Link Properties dialog box opens.
-
On the Provider tab, select Microsoft Office 12.0 Access Database Engine OLE DB Provider, and then press Next.
-
On the Connection tab, under Enter the data source and/or location of the data, in the Data Source box, enter the file path and file name of the Access database you want to connect to. For example, 'C:\myfiles\mydatabase.accdb'.
-
If the Access database is password-protected, enter your User name and Password, and select the Allow saving password check box.
-
Click Test Connection, to check that you can connect to the database.
-
Click OK.
To connect to a SQL Server database:
-
Click Browse, and then select files of type ODBC. The Data Link Properties dialog box opens.
-
On the Provider tab, select Microsoft OLE DB Provider for SQL Server, and then press Next.
-
On the Connection tab, under Select or enter a server name, enter the SQL server name and instance (e.g. 'myserver\instancename'), or click the arrow beside the box to select from the list of SQL server instances that are defined on your network.
-
Under Enter information to log on to the server, select your authentication method. You can select:
-
Use Windows NT Integrated security Select this option, to use your current Windows user name and password to login to the SQL server.
-
Use a specific user name and password Select this option, to use your SQL user name and password to login to the SQL server. If you select this option, you must enter your User name and Password, and select the Allow saving password check box.
-
Under Select the database on the server, enter the name of the database or click the arrow beside the box to select from the list of databases on that server.
-
Click Test Connection, to check that you can connect to the database.
-
Click OK.
To connect any ODBC-compliant data source using a data source name (DSN):
-
Click Browse, and then select files of type ODBC. The Data Link Properties dialog box opens.
-
On the Provider tab, select Microsoft OLE DB Provider for ODBC drivers, and then press Next.
-
On the Connection tab, under Use data source name, enter a data source name (DSN) that has been mapped on your computer by your network administrator, or click the arrow to select from the list of all the DSNs that are mapped on your computer.
-
Depending on the DSN configuration, you may need to enter a user name and password. If required, under Enter information to log on to the server, enter your User name and Password, and check the Allow saving password check box.
-
Click Test Connection, to check that you can connect to the database.
-
Click OK.
Step 2 of 4
Select the table or view that you want to import the data from.
Step 3 of 4
On this screen you can choose which fields contain values that you want to code (codable fields) and which fields contain values that describe your data (classifying fields).
By default, all fields (columns) are imported, and the analysis type (codable or classifying) is preselected based on the content in the first 25 rows of the data.
Field Selection You can use the buttons in this box to select or deselect all fields for import. For example, if you want to import only a few fields from a spreadsheet with many columns, you can deselect all fields, and then individually select the fields you want to import.
Under Field Options, you can check or change the default options for the field (column) that is currently selected in the Data Preview box at the bottom of the dialog box. The currently selected column is highlighted—you can select another column by clicking on a column header.
Field Name This option displays the field name that will be used in the new dataset. If the first row of your data does not contain column headings, the field names are set to Column A, Column B, Column C etc. You can change these field names.
Import Field Select this check box to import the field. If you clear this check box, the field is not imported.
Under Analysis Type, you can choose:
-
Codable Field Select this option if the field contains text you want to analyze—for example, responses to open-ended survey questions. The Data type is preselected—you cannot change this setting.
-
Classifying Field Select this option if the values in the selected field describe the data—for example, the ID number, Sex or Age of survey respondents. You cannot code content in classifying fields to nodes. The Data type is preselected, based on the values in the first 25 rows. If more than one data type can be used to store the values in the column, you can change the data type—refer to Valid data types for more information about data types. The Decimal Places box is available when the decimal data type is selected—if you reduce the number of decimal places, the data will be truncated.
The Data Preview shows the values in the first 25 rows and indicates how each field will be imported. Use the scroll bars to move left and right as you review the field options selected for each column. In the example below, three of the four columns will be imported:
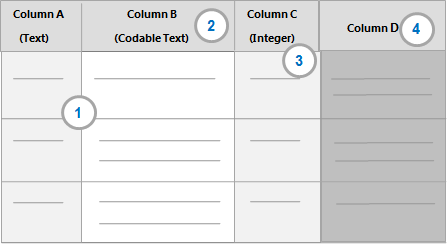
1 The background color of the columns indicate how they will be imported:
-
White—imported as a codable field
-
Light grey—imported as a classifying field
-
Dark grey—not imported
2 This is a codable field—the data type is shown in brackets (you cannot change the data type for a codable field).
3 This is a classifying field—the selected data type is shown in brackets below the column name. You can change the data type if you think another type is more suitable.
4 The dark grey background indicates that you are not importing this field.
Step 4 of 4
Enter a name and description for your new dataset.
Work with your dataset
After importing a dataset, you can use a number of techniques to organize and analyze the data—for example, you could:
-
Run a Word Frequency query to get a feel for what respondents are saying.
-
Code the content—select the text in a codable field and code at new or existing nodes.
-
Auto code the dataset to make a node for each survey question and gather all the answers—a useful starting point for further exploration.
-
Auto code the dataset to make a case node for each respondent and gather all of a respondent's answers.
-
Setup demographic data for the case nodes using the classifying information in the dataset—this allows you to compare respondent attitudes based on attributes like age or gender.
-
Create charts to visualize the data—for example if you setup demographic data, you could create a chart to see how many cases are male and aged 50 to 59.
Refer to Approaches to analyzing survey results for more detailed information or watch the video Work with survey results.