


Change the layout of shapes and connectors
You can drag shapes and connectors to move them to the required position in a model. NVivo also provides automatic layout options that can be a useful starting point for laying out your model.
What do you want to do?
Move shapes and connectors
Shapes and their connectors move together. If you drag a shape to a new location its connector will follow. You cannot move a connector on its own.
- Make sure you are in edit mode.
- Click the required shape. To select multiple shapes, select the first shape, then press and hold CTRL while you select the other shapes.
- Drag the selected shape to a new location.
Any connectors to the shape will extend to the new location.

Understand automatic layout options
NVivo provides automatic layout options that can be a useful starting point for laying out your model—experiment with the layout options to find one that suits you.
| Layout | Description |
Example |
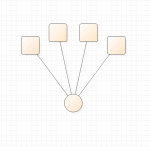
| Circular | Arrange items in a circular layout. |
|
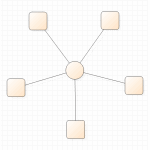
| Directed | Arrange items in force-directed layout—this is the calculated 'best fit' for the physical space (all edges are of more or less equal length and there are as few crossing edges as possible). |
|
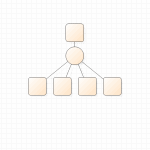
| Hierarchical | Arrange items in a hierarchy. |
|
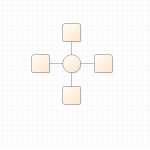
| Orthogonal | Arrange items in a right-angled layout. |
|
Apply an automatic layout to a model
-
Make sure you are in edit mode.
-
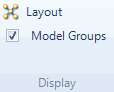
In the Model tab, in the Display group, click Layout.
The Model Layout dialog box opens.
-
In the Layout list, select the layout you want to apply.
-
(Optional) Set a minimum length for connectors in the model. This determines the distance between items in the model.
-
Click OK.
NOTE You can set a default model layout for all new projects. Refer to Set application options (Models tab options) for more information.